
[Note: This is an edited version of what I wrote in the Jedi costuming thread on the old theforce.net forum back when a handful of us spent the late spring and summer of 1999 teasing out construction details from repeated viewings of The Phantom Menace, magazine photos, and one particularly memorable epiphany about shoulder tucks while staring at an Obi-Wan window decal at Taco Bell. If you were around back then, hi from WiliQueen! 😁
There have been many developments and variations in the years since, but this basic outer robe design is pretty consistent across all prequel-era Jedi.]
Maybe the most distinctive feature of Jedi robes in the prequels is the front, back, and sleeve of each side being cut all from one piece, with seam at the shoulder or joining the sleeve to the body.
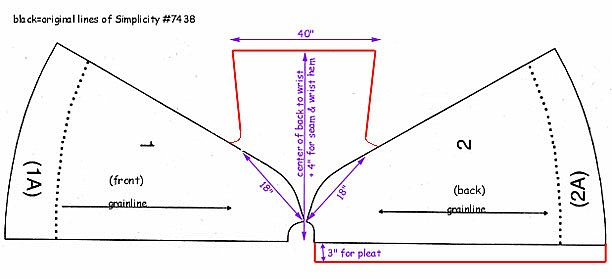
My original base cloak pattern (Simplicity 7438 from the mid-90s) has been out of print for quite some time. I eventually used it so many times that the edges were completely ragged, and replaced it this year (2024) with Simplicity 8770, but if you’re reading even a couple years in the future, chances are that number won’t do you any good either. Just look for one with pieces shaped like the black outline in the pattern image below, with a curved seams at the shoulder, no gathering at the neck, and a curved bottom edge. This will give you a nice graceful curved hem all around, without the odd angles you can get at the sides if you use rectangular or trapezoidal body pieces.
To creat the Jedi robe pattern, I start with this pattern and add the sleeves directly to the front and back pieces of it. (I never use the hood from the commercial pattern, as it’s not big enough for the Obi-Wan/Qui-Gon style hood, although it could probably be adapted for a Mace Windu style costume.)
Whatever commercial pattern you use likely won’t have the pleats in the back, so add 3 to 5 inches to the edge of each back piece to make room for them.
To get the right length when adding the sleeves, measure your from the nape of your neck to wrist, then add a few inches for the back seam and the wrist hem (however wide you plan to make that hem; Obi-Wan’s, for example, is really wide). There’s a natural shoulder slope on the cloak pattern; follow that line straight out to the end of the sleeve on top..
The next step is to measure about 18 inches from the neckline to the side of the cloak pattern for the point where the sleeve joins the body, then soften that sharp corner into a curve. After that, draw the line for the end of the sleeve, 40 to 50 inches (wider sleeves look best on taller Jedi), and join the underarm curves to the ends of that line to give you the sleeve angle.
As you can see in the the diagram below, this creates one big pattern piece that makes one half (side) of the robe.
Construction notes:
- The seams are straight at the sides, but the hoods are gathered across the back. (On Qui-Gon and Obi-Wan, anyway; Windu’s hood doesn’t seem to be gathered, or quite as large.) There’s a 3-to-5-inch pleat (again, in proportion to the wearer’s size) on either side of the center back of the body of the robe; the rest of it is straight at that neck seam.
- The hood is cut in one piece, with a seam at the back but not at the top. (See hood steps below for details.)
- Obi-Wan’s hood has a narrow double hem around the front edge and a self fabric binding over the raw edges of the neck seam. Qui-Gon’s seems to be fully lined, with the raw edges of the neck seam bound between the two layers, which will make for a much heavier hood.
- There is a seam down the center back of the robe.
- I personally like to do all seams (sides, back, and back of hood) either as French seams or flat-felled by hand, and also do a blind hand hem. This is mostly a carryover from my historical costuming habits, to show as little machine sewing as possible, but it seems like the movie costumes were made with similar thoughts in mind.
- The robe sleeves have a very wide hem, about 3 inches. This contributes enough weight to make them hang properly. (I’ve also had a headcanon for many years that Obi-Wan’s particularly enormous sleeve hems in TPM, as well as the shoulder tucks, are alterations because he’s wearing Qui-Gon’s hand-me-downs.)
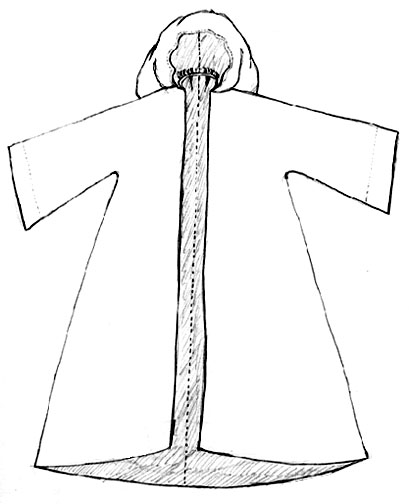
A front-view sketch of the whole thing, showing the sleeves cut in one piece with the body:
Three steps to making the hood (as seen on Obi-Wan & Qui-Gon in TPM):
- Cut a long rectangle, about 45″ to 50″ (adjust for wearer’s size) x 25″.
- Fold it in half, clip a curve around the top corner, and stitch the back seam.
- Gather the back part of the bottom edge before attaching to body of robe.

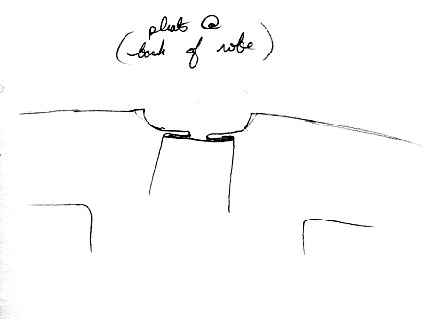
And finally, this is what I meant by putting a soft pleat on either side of the center back–fold the neck edge like this before attaching the (already-gathered) hood.
Huge thanks to Amber’s Jedi Meditation Chamber, which is mostly defunct, but for whatever reason Tripod still has the robe page with the original version of this writeup, copy/pasted directly from the forum thread, as well as MaulWalker’s measurement adjustments that make it work better for taller folks in particular. Without Amber the writeup would have been lost in obscurity and the images stashed idly on my (successive) hard drives, instead of shared and refined across 25 years of costumers. It’s taken me far too long to get around to putting it on my own site! Of everything I’ve ever made, if this is the one I (or at least my screen name) end up remembered for? I’m good with that.